

准备
购买腾讯云轻量级服务器的时候需要选择Docker ce
安装docker-compose
- 安装docker-compose并验证
1
2
3
4
sudo curl -L "https://github.com/docker/compose/releases/download/v2.2.2/docker-compose-$(uname -s)-$(uname -m)" -o /usr/local/bin/docker-compose
sudo chmod +x /usr/local/bin/docker-compose
sudo ln -s /usr/local/bin/docker-compose /usr/bin/docker-compose
docker-compose version
安装nginx-manager,
- 进入目录:
mkdir -p /opt/docker/NginxProxyManager && cd /opt/docker/NginxProxyManager - 创建对应的yaml:
vi docker-compose.yml - 键入如下内容:
1
2
3
4
5
6
7
8
9
10
11
12
13
14
15
16
17
18
19
20
21
22
23
24
25
26
27
version: '3'
services:
app:
image: 'jc21/nginx-proxy-manager:latest'
network_mode: "host"
restart: always
ports:
# Public HTTP Port:
- '80:80'
# Public HTTPS Port:
- '443:443'
# Admin Web Port:
- '81:81'
# Add any other Stream port you want to expose
# - '21:21' # FTP
environment:
DISABLE_IPV6: 'true'
# These are the settings to access your db
# If you would rather use Sqlite uncomment this
# and remove all DB_MYSQL_* lines above
DB_SQLITE_FILE: "/data/database.sqlite"
# Uncomment this if IPv6 is not enabled on your host
# DISABLE_IPV6: 'true'
volumes:
# - ./Users/brittanysalas/.config/production.json
- ./data:/data
- ./letsencrypt:/etc/letsencrypt - 执行命令进行启动(前提是docker-compose.yml在当前目录下):
docker-compose up -d -f 指定的yaml文件 - 浏览器访问:
http://ip发现页面返回如下内容,说明搭建成功1
2
3
4
5
6Congratulations!
You've successfully started the Nginx Proxy Manager.
If you're seeing this site then you're trying to access a host that isn't set up yet.
Log in to the Admin panel to get started.
服务器准备工作
主要是进行如下两方面的操作:
服务器设置转发
1
2
3
echo 'net.ipv4.ip_forward = 1' | tee -a /etc/sysctl.conf
echo 'net.ipv6.conf.all.forwarding = 1' | tee -a /etc/sysctl.conf
sysctl -p /etc/sysctl.conf防火墙开放443端口
安装v2ray
1 | 安装v2ray |
配置v2ray服务端
- 进入在线网站,选择uuid在线生成,并复制结果
- 进入到自己的家目录,新建一个
v2ray.json文件,id要重新填我们上一步生成的,如果确实不知道,参考我们本文列出的第一篇参考文章1
2
3
4
5
6
7
8
9
10
11
12
13
14
15
16
17
18
19
20
21
22
23
24
25
26
27
28
29
30
31
32
33
34
35
36
37
38
39
40
41
42
43
44
45
46
47
48
49
50
51
52
53
54
55
56
57
58
59
60
61
62
63
64
65
66
67
68
69
70
71{
"log": {
"access": "/tmp/access.log",
"error": "/tmp/error.log",
"loglevel": "debug"
},
"policy": {
"levels": {
"0": {
"uplinkOnly": 0,
"downlinkOnly": 0,
"connIdle": 150,
"handshake": 4
}
}
},
"inbound": {
"listen": "0.0.0.0",
"port": 27199,
"protocol": "vmess",
"settings": {
"clients": [{
"id": "bf9a2186-dcc4-38eb-c906-540cbdebbdac",
"level": 0,
"alterId": 0
}]
},
"streamSettings": {
"network": "ws",
"security": "auto",
"wsSettings": {
"path": "/vv/"
}
}
},
"outbound": {
"protocol": "freedom",
"settings": {}
},
"outboundDetour": [{
"protocol": "blackhole",
"settings": {},
"tag": "blocked"
}],
"routing": {
"strategy": "rules",
"settings": {
"rules": [{
"type": "field",
"ip": [
"0.0.0.0/8",
"10.0.0.0/8",
"100.64.0.0/10",
"127.0.0.0/8",
"169.254.0.0/16",
"172.16.0.0/12",
"192.0.0.0/24",
"192.0.2.0/24",
"192.168.0.0/16",
"198.18.0.0/15",
"198.51.100.0/24",
"203.0.113.0/24",
"::1/128",
"fc00::/7",
"fe80::/10"
],
"outboundTag": "blocked"
}]
}
}
} - 配置完成后,执行命令
nohup v2ray run -c v2ray.json &启动v2ray
购买域名并设置解析
- 记录类型为A
- 主机记录按需选择
- 线路类型按实际进行选择(亲身经历,自己的服务器在香港,但是选择默认即可成功解析)
- 记录值为服务器对应的IP
解析之后记得使用ping进行测试
为域名申请一个证书
- 停止nginx:
docker stop 容器id - 开始申请:
certbot certonly --standalone -d 域名,结果如下:1
2
3
4
5
6
7
8
9
10
11
12
13
14
15
16
17
18
19
20
21
22
23
24
25
26
27
28
29
30
31
32
33
34
35
36
37
38
39
40
41
42[root@VM-0-14-centos ~]# certbot certonly --standalone -d log.yirufeng.top
Saving debug log to /var/log/letsencrypt/letsencrypt.log
Plugins selected: Authenticator standalone, Installer None
Enter email address (used for urgent renewal and security notices)
(Enter 'c' to cancel): yirufeng@foxmail.com
Starting new HTTPS connection (1): acme-v02.api.letsencrypt.org
- - - - - - - - - - - - - - - - - - - - - - - - - - - - - - - - - - - - - - - -
Please read the Terms of Service at
https://letsencrypt.org/documents/LE-SA-v1.3-September-21-2022.pdf. You must
agree in order to register with the ACME server. Do you agree?
- - - - - - - - - - - - - - - - - - - - - - - - - - - - - - - - - - - - - - - -
(Y)es/(N)o: Y
- - - - - - - - - - - - - - - - - - - - - - - - - - - - - - - - - - - - - - - -
Would you be willing, once your first certificate is successfully issued, to
share your email address with the Electronic Frontier Foundation, a founding
partner of the Let's Encrypt project and the non-profit organization that
develops Certbot? We'd like to send you email about our work encrypting the web,
EFF news, campaigns, and ways to support digital freedom.
- - - - - - - - - - - - - - - - - - - - - - - - - - - - - - - - - - - - - - - -
(Y)es/(N)o: N
Account registered.
Requesting a certificate for log.yirufeng.top
Performing the following challenges:
http-01 challenge for log.yirufeng.top
Waiting for verification...
Cleaning up challenges
IMPORTANT NOTES:
- Congratulations! Your certificate and chain have been saved at:
/etc/letsencrypt/live/log.yirufeng.top/fullchain.pem
Your key file has been saved at:
/etc/letsencrypt/live/log.yirufeng.top/privkey.pem
Your certificate will expire on 2023-05-18. To obtain a new or
tweaked version of this certificate in the future, simply run
certbot again. To non-interactively renew *all* of your
certificates, run "certbot renew"
- If you like Certbot, please consider supporting our work by:
Donating to ISRG / Let's Encrypt: https://letsencrypt.org/donate
Donating to EFF: https://eff.org/donate-le- 执行命令
crontab -e,添加如下内容到crontab中:1
15 2 * */2 * certbot renew --pre-hook "docker stop `docker ps | grep nginx-proxy-manager | awk '{print $1}'`" --post-hook "docker-compose -f /opt/docker/NginxProxyManager/docker-compose.yml up -d"
- 执行命令
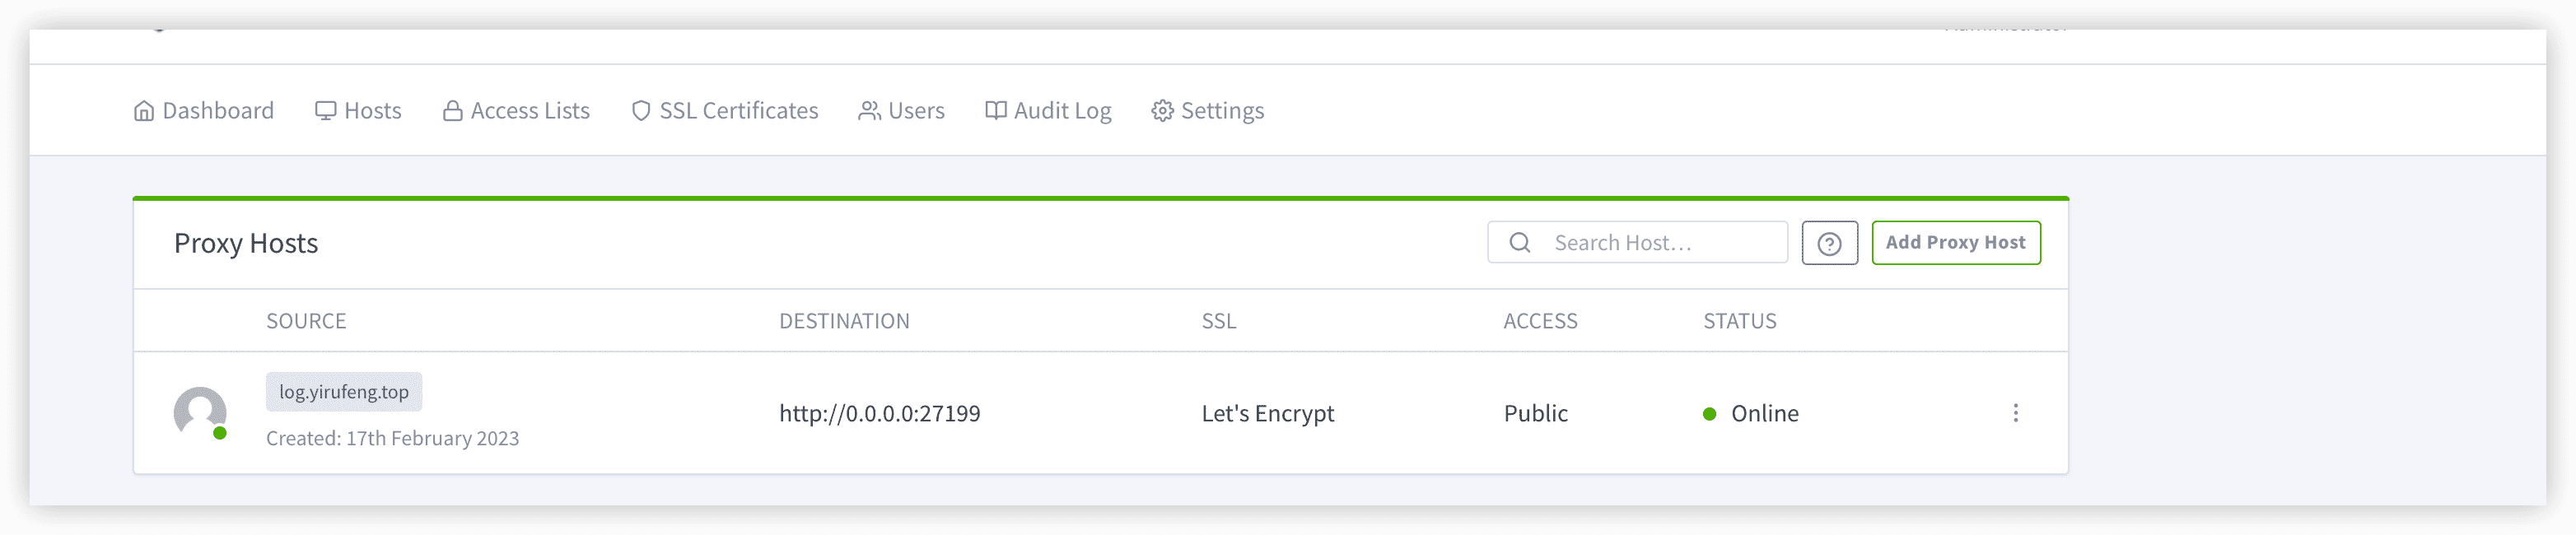
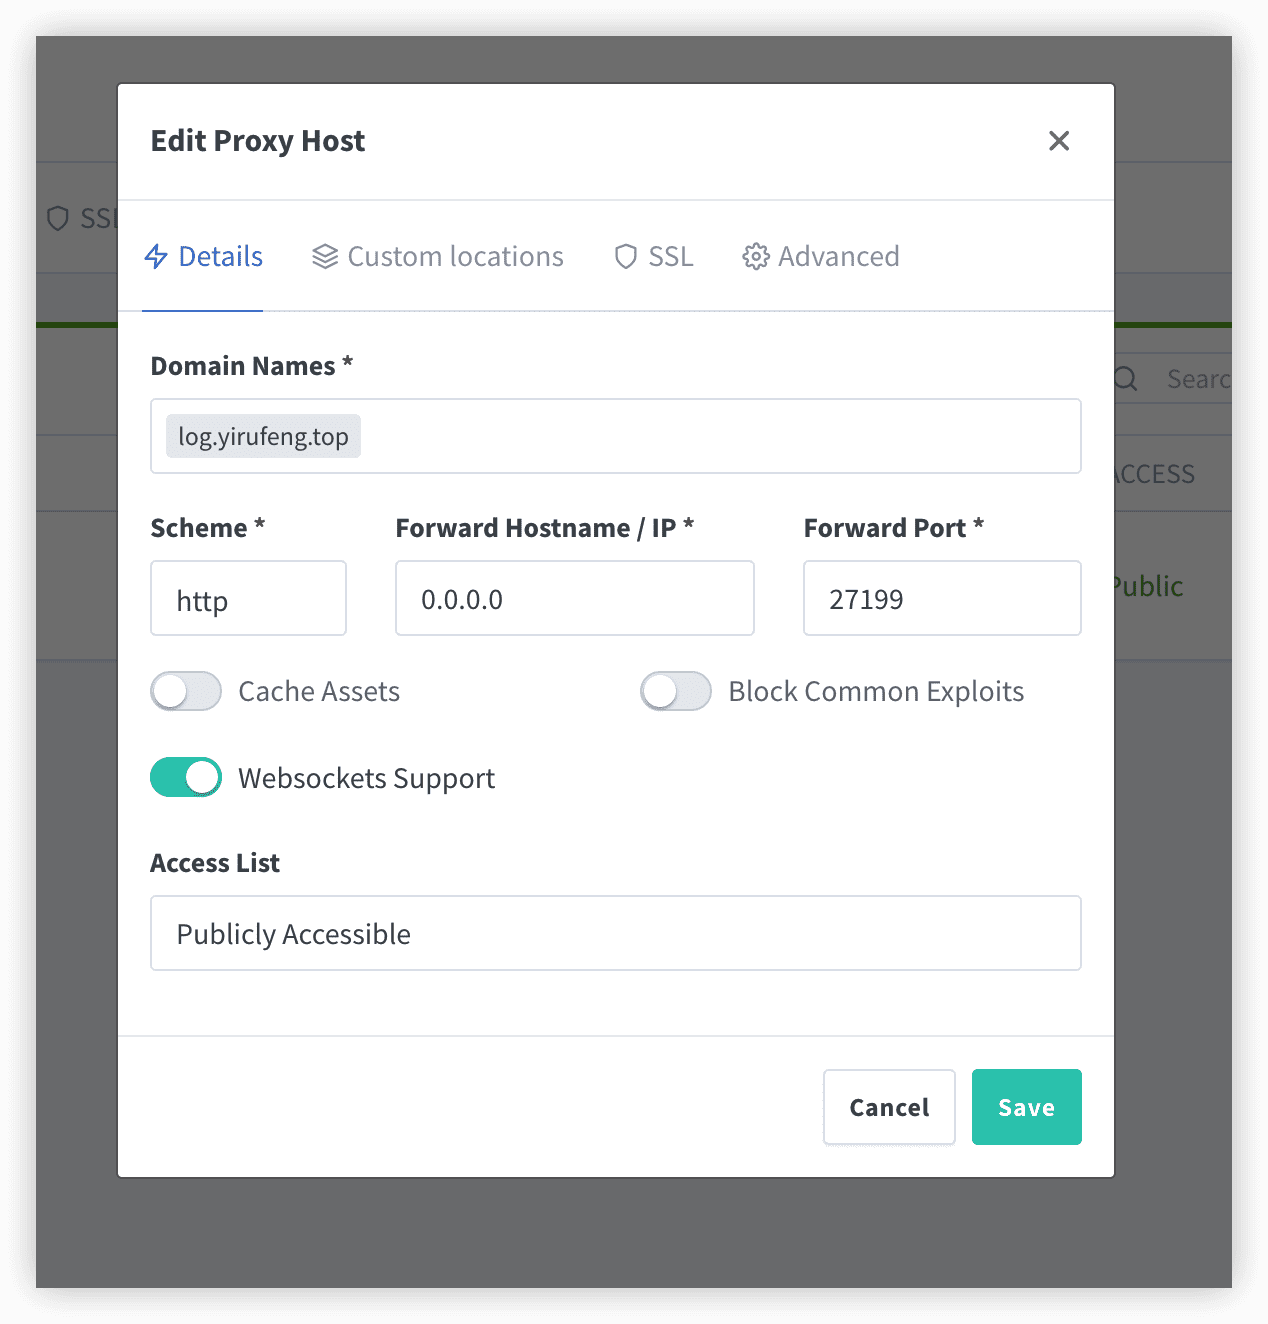
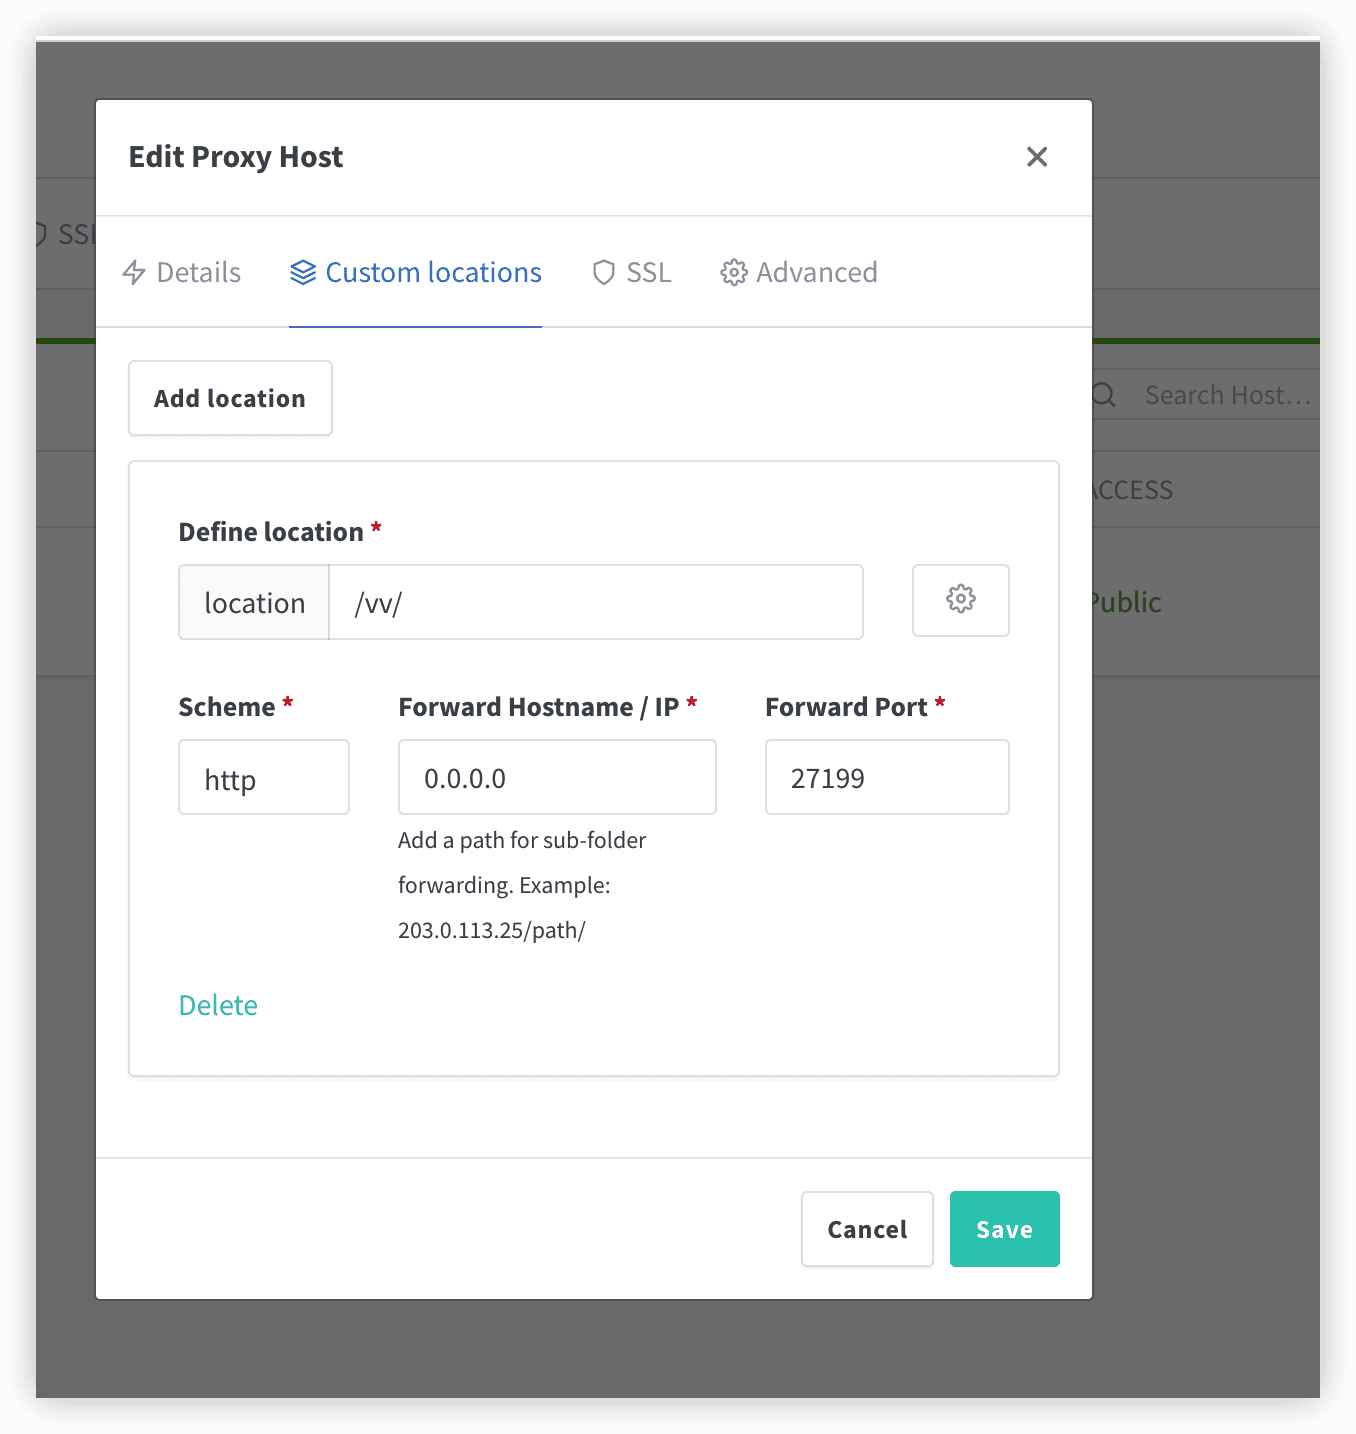
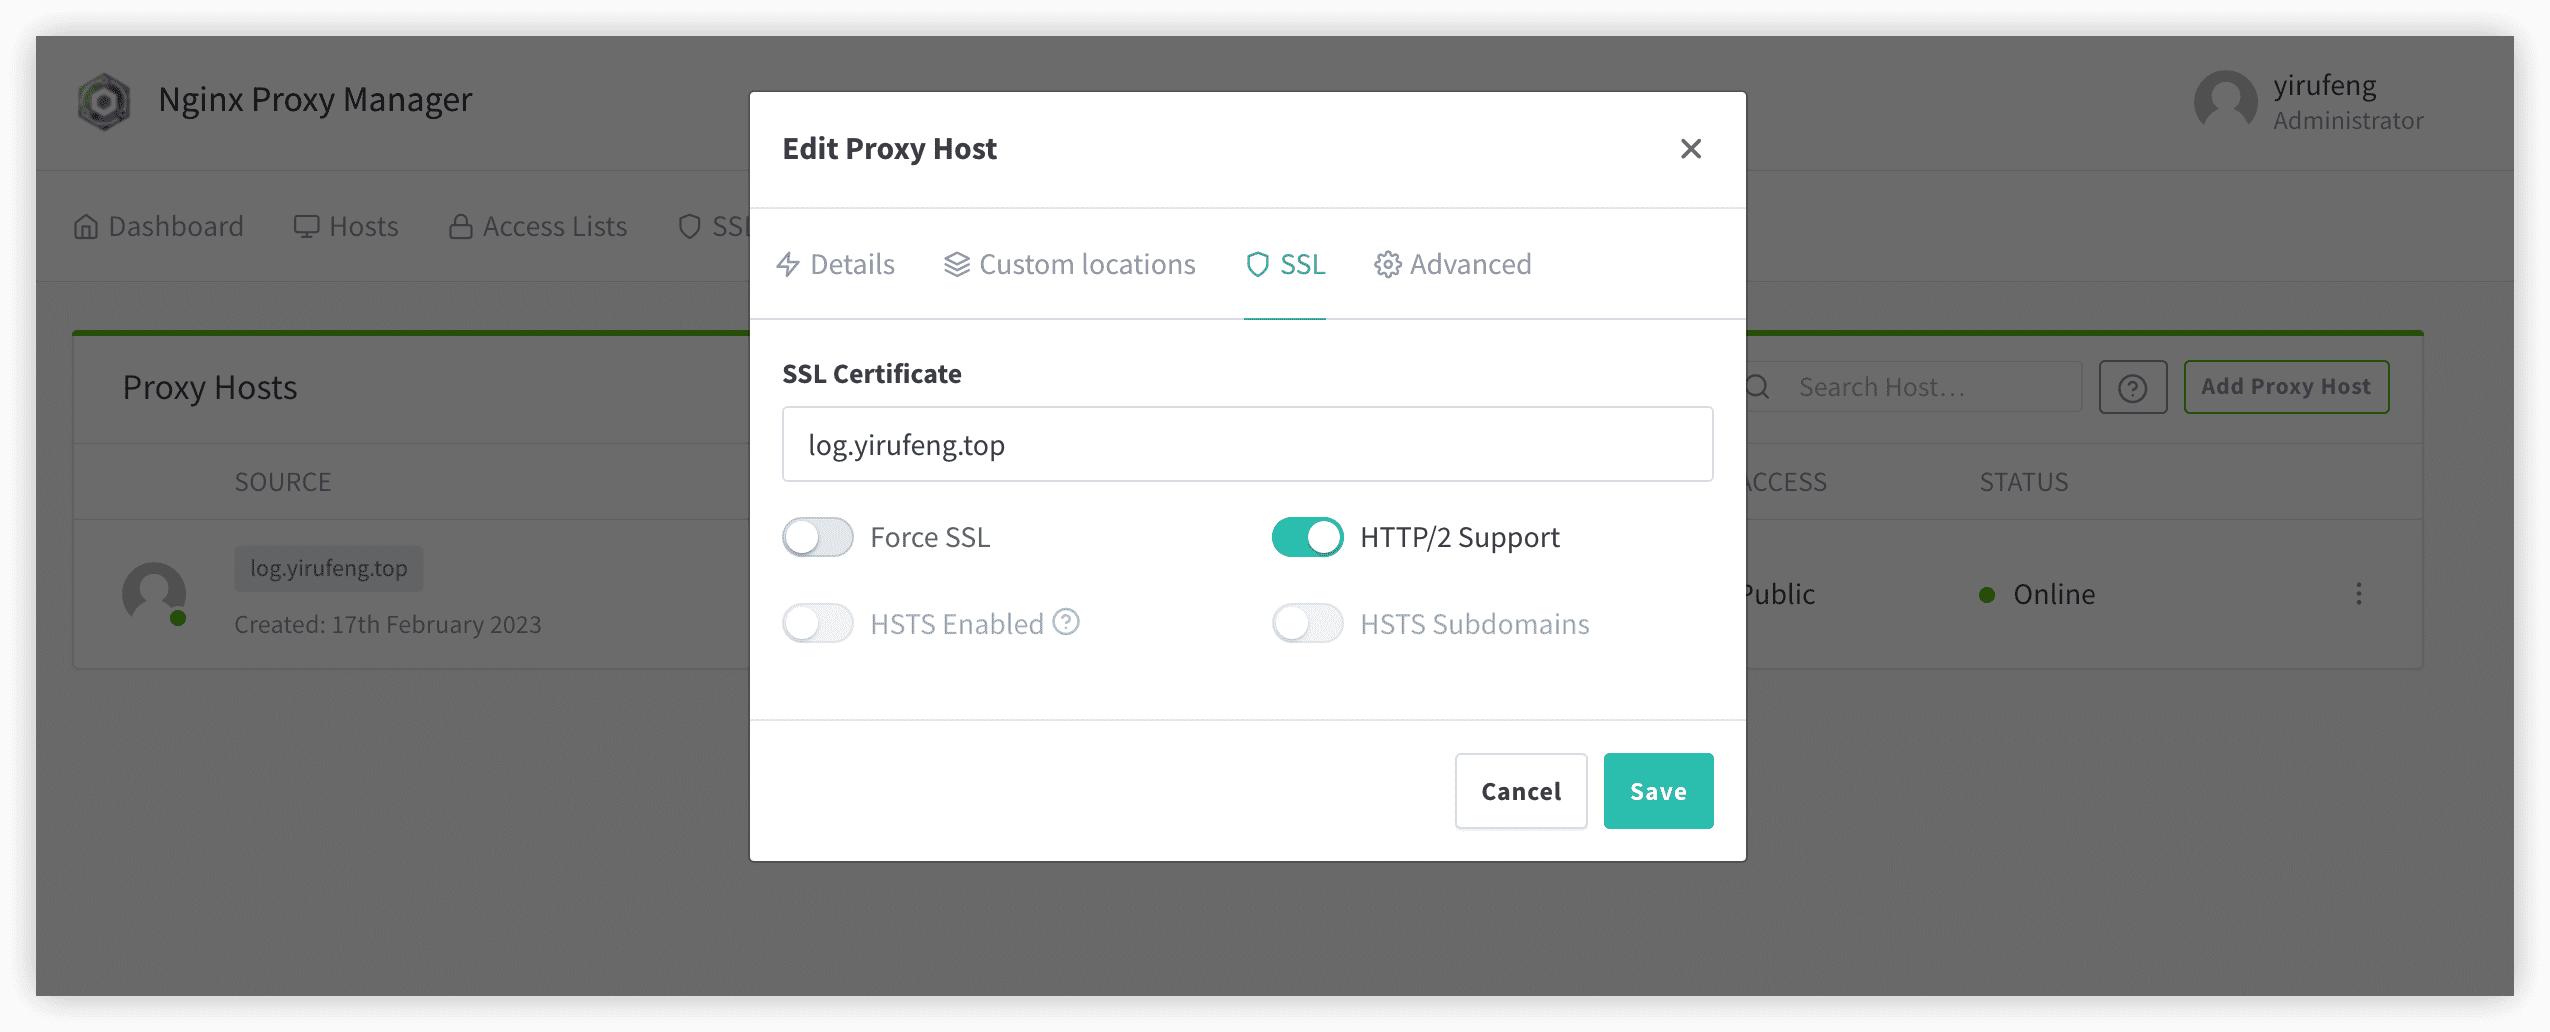
配置nginx做流量转发和伪装
登录nginx-manager管理页面进行配置:http://服务器ip:81
默认用户名和密码如下:
1
2
Email: admin@example.com
Password: changeme按照下图中的内容进行设置:
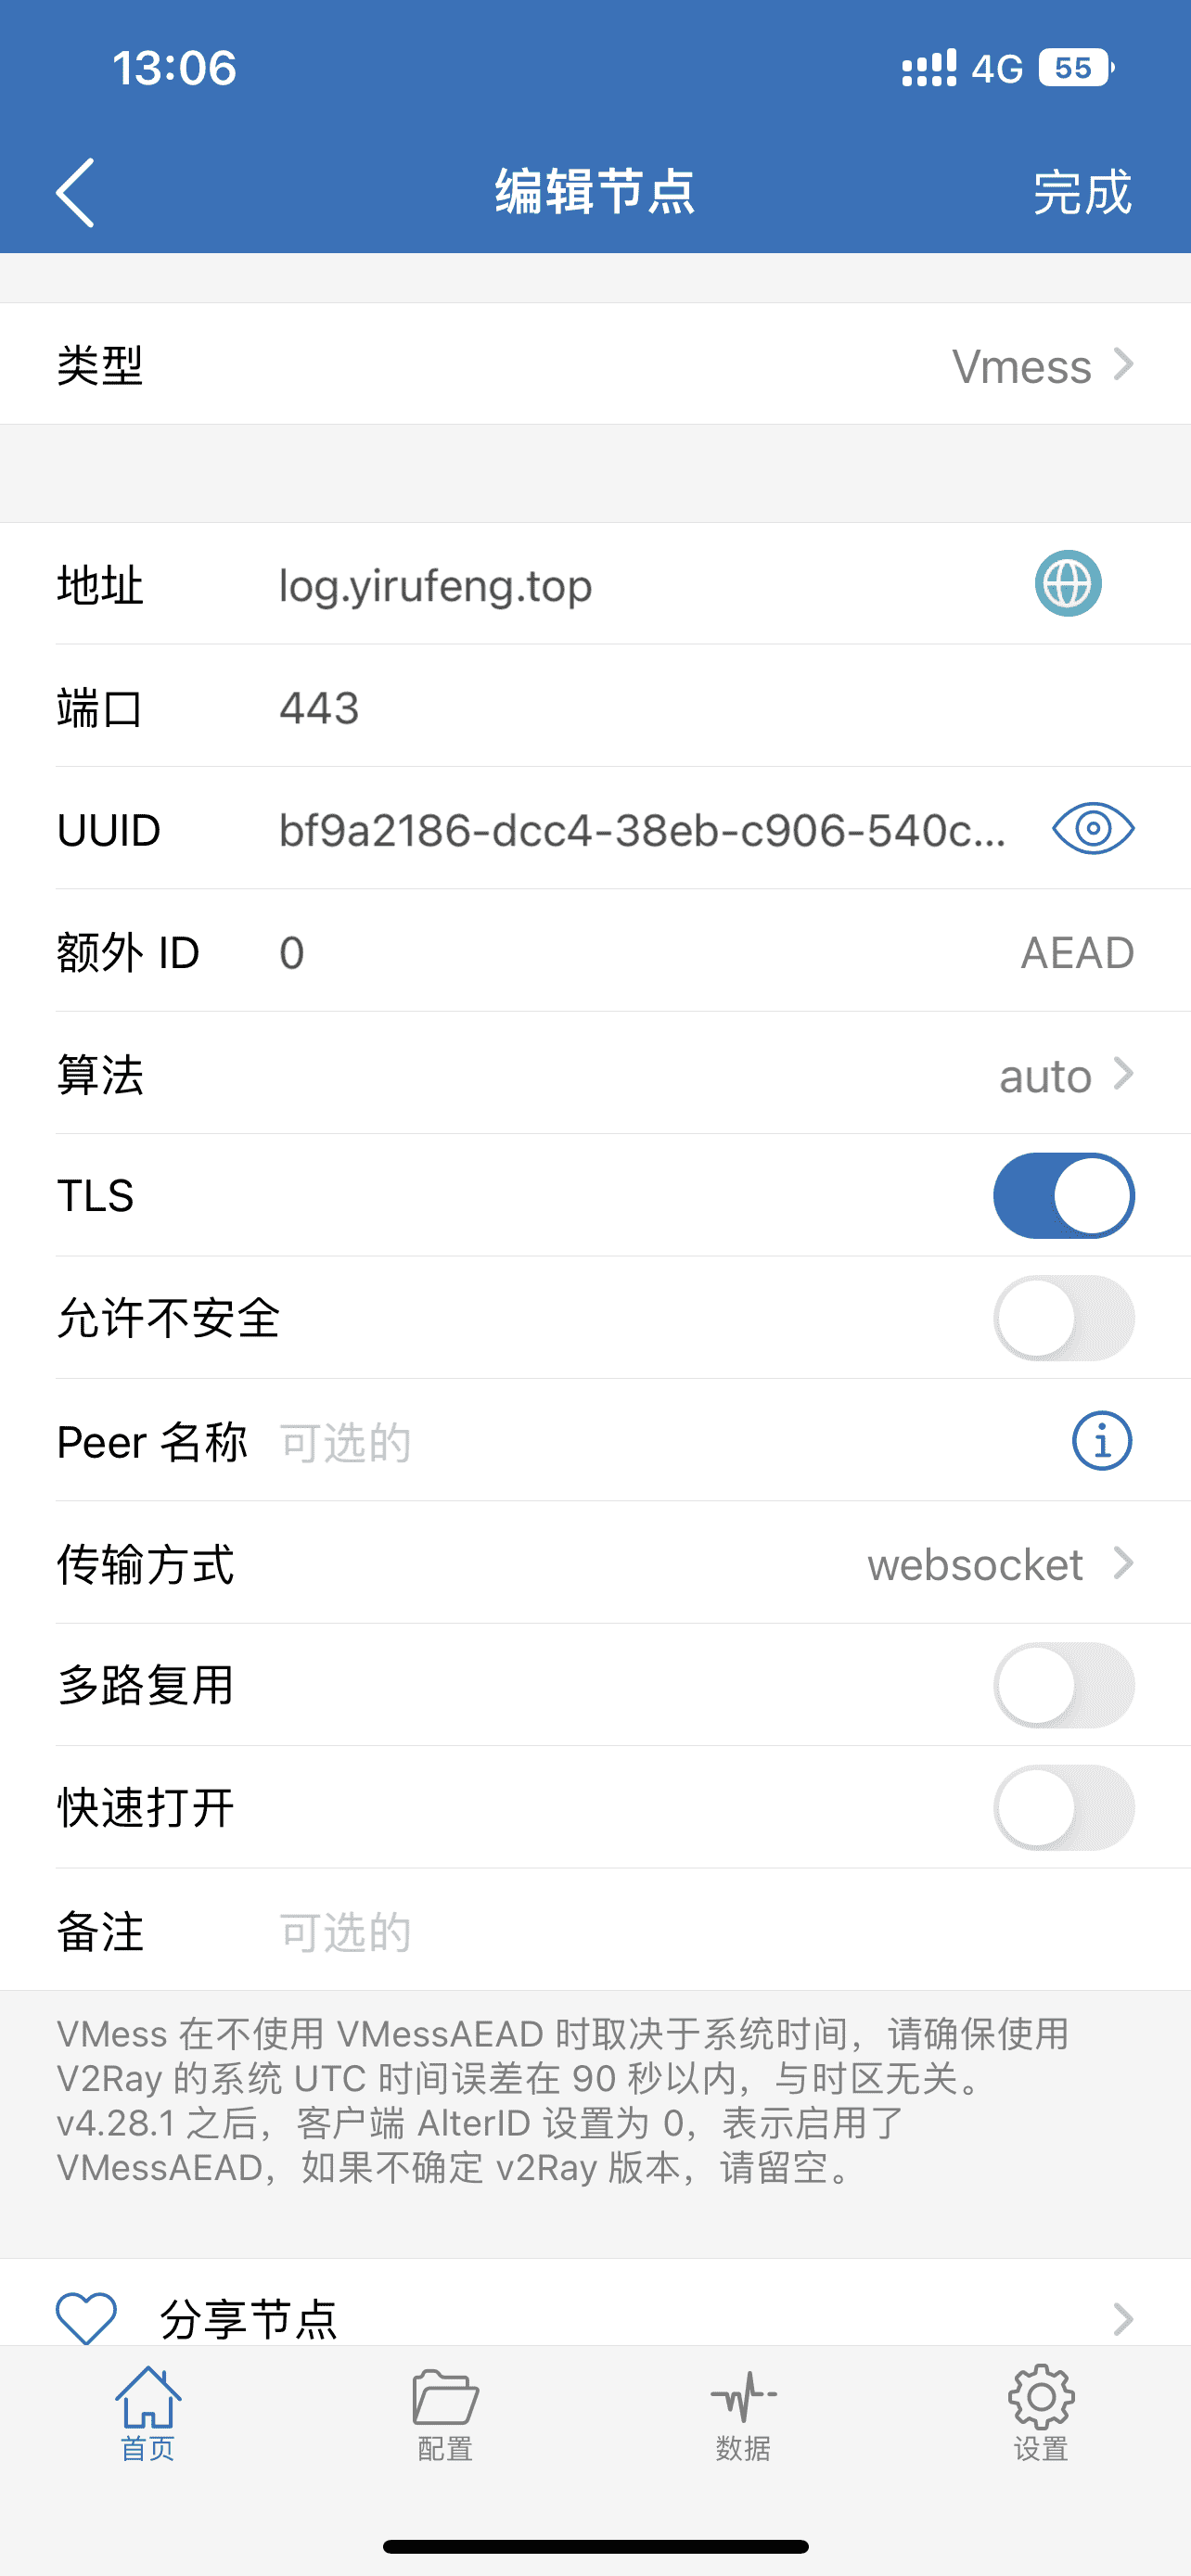
手机上小火箭设置如下:

参考
小知识: docker run 运行了一个容器之后,容器里面的内容存储到宿主机的哪里呢,答案如下
1 | cd /var/lib/docker && ls 且换到宿主目录,查看容器在宿主目录的存储位置 |